Friday, August 29, 2008

bunny garden :)

My sister made an elaborate card of bunnies for me. Here is one of the cutest scenes:


I digitally colored it and based on my interpretation of it, titled it "Bunny Garden"! Now that's a place I would love to visit. :)

Friday, August 22, 2008

shopping spree!

So, my birthday was yesterday. It was so fun! My husband basically took me to every craft store that I wanted to go to. :) I got some paper punches, wood dolls to paint, paper/cardstock, and other little knick-knack kind of stuff. :)

Plus, we went to this new yogurt place. There were so many toppings. I had apple jelly, mochi, mango, and kiwi on mine. YUM! YUM! Then, we drove down a street until it ended. :) Lastly, we stopped at the beach. It was a lovely day.

Thanks for all the birthday wishes!!! You make my week super special. :)

And for those who were curious about the birthday surprise...here it is:


They're cellphone/zipper charms!

Saturday, August 16, 2008

more birthdays!

Here is something I did for someone's special birthday:


And here is a quick design for a card I'm making for my nephew's birthday at the end of this month:


On a side note, I just sent out the first batch of birthday surprises yesterday! Once everyone receives it, I'll post a picture of a couple of them. :)

Wednesday, August 13, 2008

Birthday Surprise!!!

I've always loved the way hobbits celebrate birthdays. Instead of the receiving gifts on one's birthday, one gives gifts on his/her birthday!!! So, I wanted my upcoming birthday to be celebrated such a way...Hobbit style!!!

I decided to utilize my ETSY, bitsy Shop, to give away a little handmade present to anyone who wants to celebrate my birthday with me!!! All you have to do is pay for the shipping/handling fee (which is just $1.00) and your little present will be mailed to you this week! :)


I've only listed a handful of presents, but if there's anyone else who wants one, just send me an email, convo me, or just leave a comment on this post and I'll reserve a birthday surprise for you on etsy!

Monday, August 11, 2008

Birthday Month!

August is my birthday month! Here are some pins I have been designing for the celebration! :)

Tuesday, August 5, 2008

the battle rages...

This is a diversion from the normal crafts...just some pondering that I've done...

The battle never ceases, despite the fact that there are long periods in our lives without fighting, without bloodshed, without even fear or weeping. However, do not be fooled. Those times are merely rest stops; the battle still rages. Do not put down your weapons. Do not give up your defenses. Do not think that you're safe and secure.

The enemy is lurking, and he is waiting for you to give in to the belief that everything is fine; he wants you to embrace the status quo. The truth is everything is not as quiet and calm as you may think. The battle rages on, and the rest is only there to help you prepare for battle!

Friends, know God. He is your defense. The battle will continue, and when it does, will you be ready?

Monday, August 4, 2008

the pits

This is an illustration I did yesterday for a school project.


Life may seem very peachy, but it's really just the pits.

I know there are a lot of people out there with pain and fear, disappointments and sorrows, regrets and despair... and I just hope and pray that you guys will make it. Just know that you're not alone. (Forgive me for my randomness.)

Friday, August 1, 2008

Stamp Carving Tutorial: PART II

In case you missed the first part of my Stamp Carving Tutorial, here it is: Stamp Carving Tutorial: Part I.


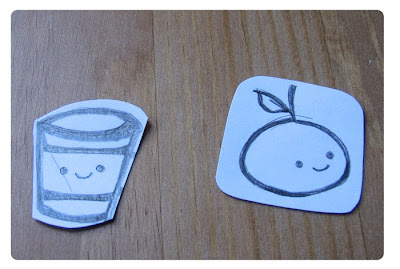
Step 1: Either trace or draw your image with pencil. Make the pencil markings as dark as possible because this will determine how bold your transfer will be. The bolder the transfer, the better!


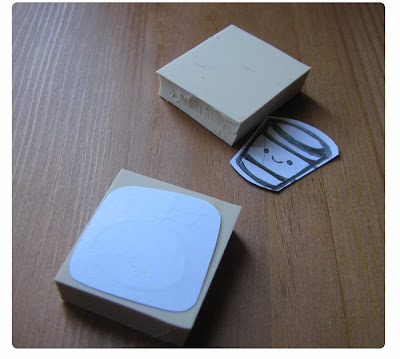
Step 2: Cut a block of carving material to the size of your image. Press the image to the material and rub. Try not to move the image because you want one solid transfer. If the image shifts while you're rubbing, you may end up with multiple copies of your image on the carving material, which is bad. :)


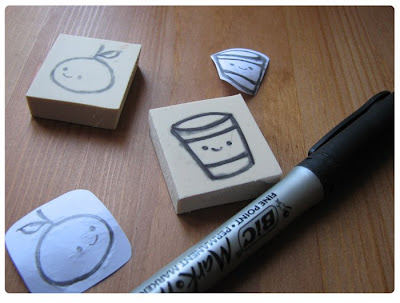
Step 3: Trace the pencil image with permanent marker. This is important because the pencil image tends to fade during the carving, so it's nice to have a permanent outline of the image on your carving material.


Step 4: Carve out everything that's not in permanent ink. I use a small carving tip, I think it's size 1, for the details and I'm currently using size 3 to remove the bigger chunks.


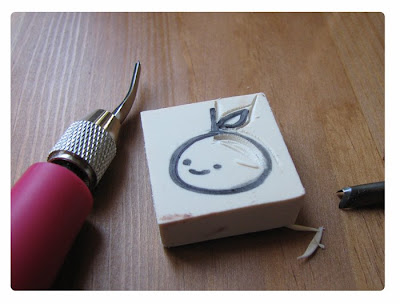
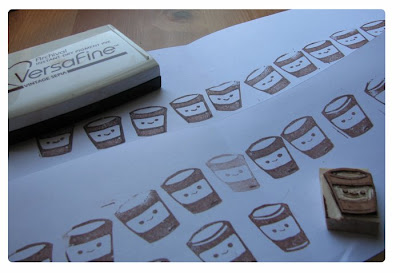
Step 5: During my carving process, every time I carve something out of my stamp, I ink it and make an impression. This helps me see the progress of my carving. The hardest part about stamp carving, however, is knowing when to stop. Your stamp can potentially lose an eye or mouth if you keep trying to perfect it.


Step 6: We're almost done (Part III is next, so stay tuned).

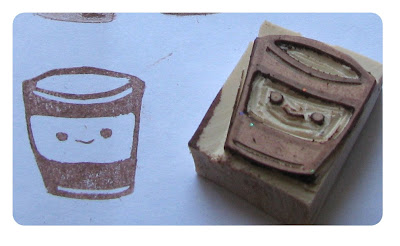
Here's my coffee cup...for now (ha ha):

Holly House!

I'll be posting the stamp tutorial: PART II today, but first, I just had to post this picture right now.

Holly from Charmed Life sent me this beautiful Christmas house. Look at my little doll, she's so excited to visit! :)


Isn't it BEAUTIFUL??? I can't believe how lucky I am!